The radiator had obviously developed a leak for the previous owner and it had been bypassed in typical Heath Robinson fashion.

On removing the assembly from the vehicle I found that the bulkhead area behind it and the box itself looked to be in a poor state although it wasn’t quite as bad as the pictures suggest:


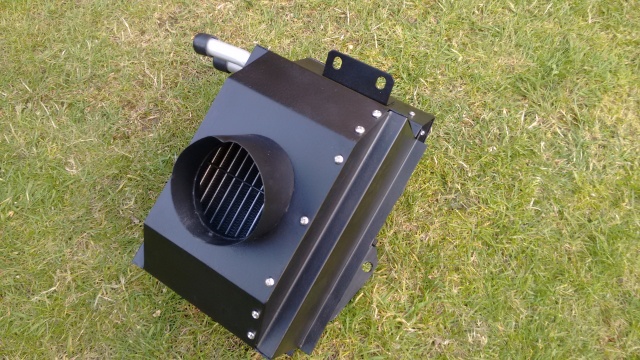
The steel housing of this unit is extremely well made of quite a heavy gauge metal so after grinding away the surface rust and treating any stubborn areas with Granville Rust Treatment then several coats of Screwfix ‘No Nonsense’ zinc-based ‘galvanising’ spray paint, it seemed as good as new.


I finished the box, inside and out with silk-finish black metal spray paint from Lidl’s and slotted in the replacement Britpart radiator. I bent the locating tabs down to hold it securely and reassembled the housing with stainless self-tapping screws from STIG fasteners. I have purchased a number of stainless fasteners from this company and highly recommend them, they are quick, well-priced and efficient. I normally receive my order the next day and you can tell by the way the items are methodically packed they are a very good company.
To replace the foam gasket that had disintegrated into a powder, I used a left over piece of the adhesive-backed neoprene sheet that I had used on the seat box lids. I substituted the two screws on this face with pop-rivets so as to reduce interference and keep an airtight tight seal against the bulkhead.

Removing the heater box and blower unit (to be covered in another post) revealed a bit of a mess on the bulkhead and upper footwell section, but fortunately this first glimpse was deceiving, just surface rust. The square hole is sealed here with a piece of plastic from a Lidl’s tomatoes container, great value at 49p for six.

I also removed the (poorly fitted) fuel filter housing, VIN plate and near-side cable grommet plate to gain access to even more surfaces and rubbed it down to bare metal very easily. I treated any rust that I couldn’t clean out with Granville Rust Treatment. I was delighted to find in the shed an unopened tin of ‘Finnegans No 1’ rust treatment. I remember this stuff from years ago, unlike other Hammerite paint products (I never use it) it is very easy to apply and I think it does a great job. I used a small roller to apply two good coats.

I then gave it two rollered coats of satin-finish marine blue enamel.
I’ll cover refitting of the heating system in a later post as this job has led to yet another! I will be replacing the blower unit with something more effective, and make a better job of fitting the fuel filter unit. This was ‘on the huh’ (Norfolk-speak for ‘not quite level’) and held in place with self-tapping screws which had distorted the thin metal of this section of bulkhead.

The box come out pretty good!
LikeLike
Thanks! Yes I’m pleased with that, although an engineer friend pointed out that I shouldn’t have used stainless fixings due to galvanic corrosion, it’s not caused any problems so far though.
LikeLike
Hi LandyBlog, I am looking for some help with my heater box ….is there a way to contact you directly? Jared
jaredmcnabb@gmail.com
LikeLike