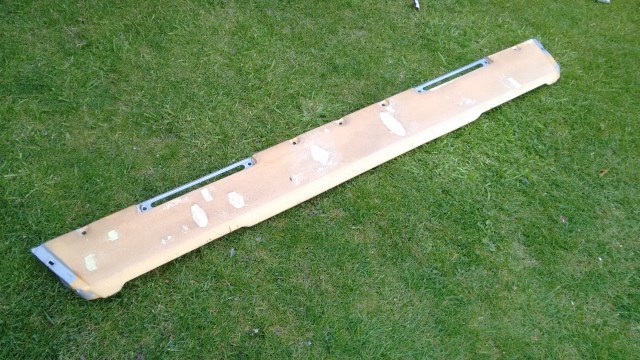
Carrying on from last weekend’s preparation of the upper dash, it was time to overcome the man-flu and get outside in the lovely September sunshine to finish the upper dash panel.
I had managed a couple of lunchtimes in the shed during the week to get this far. On the first I squirted some Polycell Expanding Foam into the holes in the existing foam padding. This is very messy stuff and I managed to get myself covered in it.
If I was doing this job a second time:
I had planned to seal the foam with a very thin solution of Unibond PVA. I learned from this experience, and would recommend to anyone else doing this job, that the PVA should be applied before filling the holes.

Next day I sliced of the excess foam with a bread knife. I do have quite a few proper hand tools, saws and knives but after trying others this really was the perfect tool for the job because I could get in close to the existing surface yet the blade was rigid enough to keep a straight edge.
I shaved off the remaining excess with a Stanley Surform (this tool, that I last used in the 1970s, is a cross between a cheese grater and rasp and I’m pleased that at last I have found its true calling). The only downside was that the new foam is slightly stronger and more resilient than the existing, so I ended up losing some of the original material. I applied several coats of very thin PVA solution, leaving it to dry in the sun. Once dry I had a much better material to work with, it still had its spongy softness but was no longer crumbling. I filled the new holes and the next day it was very easy to sand and shape with none of the previous problems.
Vinyl Covering
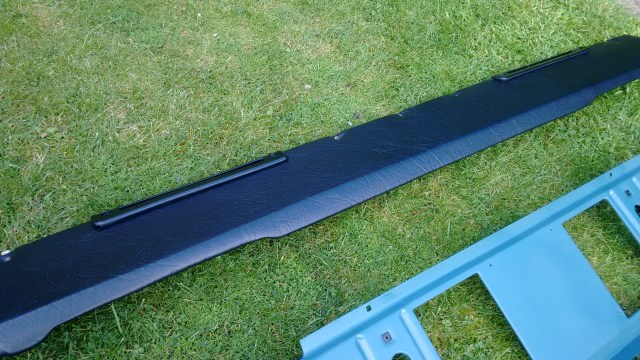
I sourced some fire-retardant black vinyl cloth from Fabric UK for only £8.99 per metre. You actually need less than half a metre for this job as the width of the roll (1400mm) is slightly more than the length of the panel. I ordered 2m as I have a very tatty cubby-box to recover at a later date.
The original material had no fabric backing but I thought that this would be more forgiving being a little thicker.
I laid some cardboard on the lawn on which to work and rough-cut the vinyl to shape. I used Screwfix ‘No Nonsense’ contact adhesive spray and fixed it to the top plane first. I pressed it with a damp cloth to ensure a good contact all over. I used a heat gun to add a bit of stretch where needed and pulled the material over the ‘windscreen end’ and smoothed it around the profile ensuring a good flat finish.
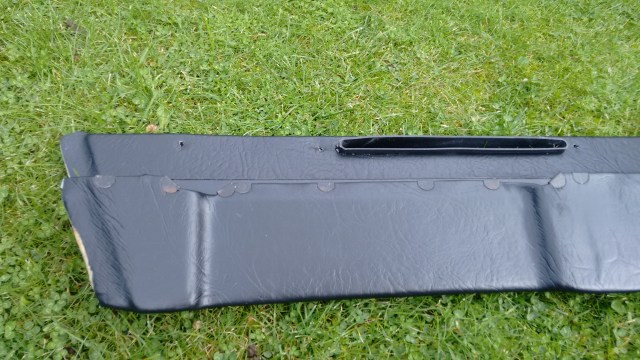
For the front end I used heat again to do the part I was dreading, where the recesses are at either end. This was surprisingly effective. I held the stretched vinyl tight with one hand and with the other quickly fixed the half-moon clips and hammered them home.
I couldn’t be more happy with the result, it looks really good. The vinyl is probably more prone to scuffing than the original, and the texture is heavier but I’m not worried about originality so much, it looks smart and hopefully will last a few years. To prevent scuffs I will enforce a strict policy of NO STILETTOS ON THE DASHBOARD!
Plastic end panels
These were scuffed and discoloured way beyond the capabilities of ‘Back to Black’ so I cleaned them thoroughly and sprayed with etch primer and satin black.
The ‘vinegar’ panel
I decided to paint this marine blue rather than the original black as I want this area to have a more ‘continuous’ look, it turned out pretty good.
Demister vent ‘funnels’ / duct
The ducts that guide warm(ish) air to the demister vents are each made from two sections of thin plastic held together with staples. These had distorted over years (this surely can’t be due to heat from the ‘heater) and there were now large gaps in them. I figured that valuable heat would be lost through these gaps but I didn’t want to buy new ones. Working one side at a time, I used a hot-melt glue gun to run a fillet of adhesive along the gap, having warmed the plastic first with the heat gun.
I then quickly shut the joint tightly in the vice using the quick release lever. This cooled the glue and plastic and it has worked very well, the funnels are now sealed and the staples tightened in one go.
Can’t wait to fit it!
Having such a lovely afternoon in the fresh air, and being very pleased with my efforts was the perfect tonic and my man-flu subsided to the point where I had stopped making pathetic grunting and groaning noises at the merest physical effort. I’m really looking forward to fitting these refurbished parts but they now make the instrument binnacle mount look really scruffy. The corners have snapped off and the brass thread inserts are held in with cable ties and super-glue.
So after tea I bit the bullet and ordered a new mount from Raptor Engineering. With the postage it cost just over £50, so not cheap, but praise for these units is universal. As others have noted, they are no more expensive than the standard plastic replacements that will break again eventually. Such is the wiring on an older Land Rover, accessing the innards of the instrument panel seems such a regular activity that maybe a hinged panel would be more appropriate, with a ‘welcome back’ sticker inside….
To sum up the day’s activities, a few photos:


Last night’s gig
Kenny Lee and Hustler are a very popular sixties function band that have been going for at least 25 years but they did start out as a country band. There are still one or two places in Norfolk where country music is played exclusively and for these gigs the band has such a repertoire to call upon. Tonight we were at North Walsham Community Centre.
Most of these songs were new to me so I still had to put in quite some time to learn a few. The bass parts aren’t too demanding and most can be ‘felt’ but it’s handy to have a basic insight of their layout and a note made of any rare unusual chords.
There were some technical problems with the bass rack that the boys couldn’t resolve, despite frantically trying, almost up to the start time. If only I had brought my amp. They have a lovely set-up that uses no back-line whatsoever but it is very complex. At the last moment it was decided that the only option was to run my bass through a 15″ powered wedge that I turned to face the audience. Surprisingly the sound was more than acceptable, although not nearly powerful enough. The venue runs a very strict timetable so we went on soaked in stress-induced sweat and without the usual relaxing drinks and chat.
I realised from the off that I hadn’t even tuned my bass, and with the quick delivery of each song there wasn’t time to tune so I found myself bending the strings into tune as I played. The Ibanez bass that I’ve been using for a while wasn’t at fault, it will stay in tune for weeks. It’s just that I use a gig bag rather than a hard case (for portability) and as I slide it in or out, the machine heads get turned so that they are all in-line.
In spite of all this we were very well received and that’s all that matters. Musically, none of us felt challenged or fulfilled but there’s still the social side of it to enjoy, the camaraderie, being appreciated, and for me – some useful cash for the Land Rover fund. I’m lucky to have one hobby that (almost) pays for the other.


Well done at the gig Nige – I’ve done a few of those sweaty stress starts myself and it does take it out of you. I got so paranoid about gear failure at one point I realised I was close to duplicating everything and losing my nights profit in extra fuel dragging it all around 😉
LikeLike
Thanks Mog! I think it was down to patch leads between the two racks being plugged in wrong, the system was designed and assembled by regular bassist Laurie and unfortunately only he knows how it all goes together!
LikeLike
WOW, stunning job, well done. You did a far better job than me. 🙂
LikeLike
Thanks very much Ian, but I wouldn’t go that far! I consider your dash to be the standard by which others are judged as well as being a huge inspiration to get on and do stuff…
LikeLike
Nice work, especially the dash, that looks awesome!
LikeLike
Thank you, one of the more pleasing jobs, it turned out better than I expected and worth the time spent.
LikeLike
[…] was pleased to see that the upper dash is still looking good, I had wondered if temperature extremes would cause the fabric to split where […]
LikeLike