My Mod
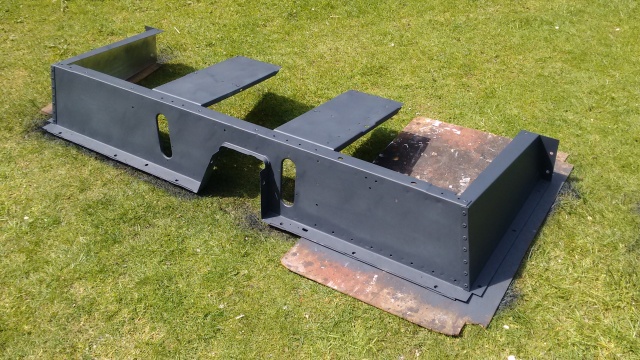
As mentioned in a previous post I wouldn’t be able to live with pop riveting into the unevenly spaced holes left by the drilled out spot welds. I experimented with the new side panels, did some measurements and finally decided on assembling it the other way round, so that the end panels are on the outside (normally the lip from the front of the seatbox would be visible from the side of the vehicle). This meant that while not correct, the rivets could be lined up perfectly. I ended up with this:

I did take the seatbox out to the vehicle to make sure everything would line up OK, it’s fine, well within the generous tolerances found on any old Land Rover. I continued the rather enjoyable task of fitting it all together.
I sprayed the underside of the seat box with etch primer then Lidl’s metal paint, and sealed all joints with self-adhesive foam. I got several rolls of this in various widths and thicknesses from Ebay. On previous projects I have used clear silicon for this purpose but I am one of these awkward ‘cack-handed’ individuals who cannot control a simple sealant gun. Also, I thought it would make any future disassembly less troublesome.

I am painting the vehicle in the original colour (Marine Blue) but I have chosen a satin finish. As I don’t have a garage I didn’t think spraying in my driveway would be the most sociable thing to do, so I will be painting with a ROLLER. I got the paint from Paintman (very nice people) and have found I get the best finish using a tiny (2″ I think) roller which I got from Decorating Direct. I think that the satin finish will be more forgiving for roller application and I am quite pleased with the finish. I found that a 4″ roller didn’t allow me to control air bubbles, or paint into corners. I also got a couple of cans of spray paint from ‘Paintman’ which are handy for hard-to-reach areas and for spraying fixings before use. I normally collect all likely nuts, bolts and washers that I’ll need a day before doing the job and give them a quick coat of etch primer and marine blue paint, partly for cosmetics and partly for protection.
You will have realised by now that I am no rivet counter! This is not a restoration job, just running repairs, dealing with corrosion, attempt to make the vehicle look reasonably smart, and hopefully extend its useful life, on a budget and with limited skills and equipment.

I then loosely fitted the angle across the back and checked that the holes lined up with the seat rails. My careful measurements paid off, it was perfect.
The seat rails are held in with countersunk set screws, except those directly above the fuel tank. The captive screws were corroded and I couldn’t source replacements so I made a couple of new ones out of an old carpet edging strip and a couple of BZP M6 set screws…

I then set about assembling the ‘flat pack’ battery box from YRM. This is dead easy as instructions are clearly marked on the panels, just a case of drilling and pop riveting. It’s extremely robust and I hope it will last for many years to come.
How it looked before:

Fixing it to the seat box:

I then added as many of the ancillaries as I could to the seat box while out of the vehicle.

Photo-bombed by my best friend:

If I’m out in the garden this little chap won’t be far away, he follows me everywhere and even looks for me through the kitchen window. He loves sultanas, but much to my disgust, he prefers Sainsburys basics to Lidl’s.
The aluminium panels of the battery tray have a protective sheet which is extremely well bonded to the metal. I have left this attached to the underside to help protect it from the elements.
Rebuilding the seat box has been a very enjoyable Sunday afternoon job, thanks to the panels from YRM Metal Solutions, one of the many small businesses up and down the country that supply parts to us Land Rover enthusiasts. I highly recommend them.
Next post will be fitting it into the vehicle.
WOW! Night and day. That seatbox looks awesome from here 🙂
How did the paint sustain its brightness through this year?
I have the feeling that roller paint tends to loose its colour / bling way quicker that any other types of paint…
Regards!
LikeLike
Thanks! Yes the paint looks just the same, but of course it’s not exposed to the elements, I haven’t yet painted any external panels so it’s difficult to know how long it will last. By using satin finish I think it’s more forgiving if it fades.
LikeLike
Looks great. How do you take the seat rails apart. I’m struggling with disassembly and don’t want to drill out too many holes.
LikeLike
Hi Andy, I don’t think I actually took the rails to pieces on this one, just opened them as far as I could and got an old toothbrush in there to clean them with petrol. I think on my lightweight I was able to tap out the stop pins so they slid apart but it may have been a different design (rails on a lightweight offer little adjustment anyway). Sorry not much help. Thanks for your interest and good luck with your project, I’m hoping to get working on it again soon once work has calmed down a bit. Nigel.
LikeLike
Many thanks I had a feeling that might be the case.
LikeLike